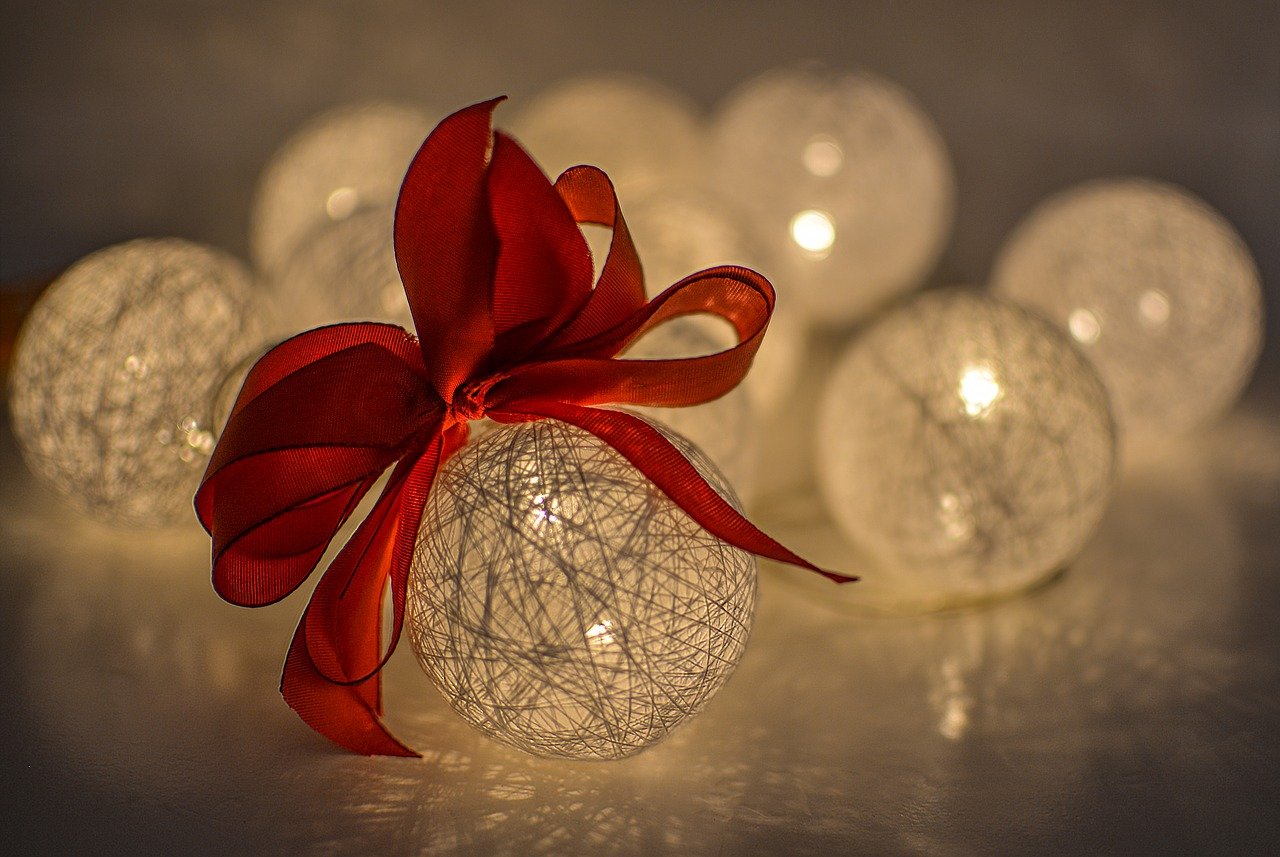
Cotton balls are a very popular interior decoration that you can make yourself. These lights are the perfect decoration not only for everyday use, but also at Christmas time – they are a great substitute for the lights on the Christmas tree. Check out how to make them!
To make cotton balls you will need:
led chain,
cordon – in whatever colors and quantity you want (one cord can make two balls),
balloons – water balloons are the best for this (you don’t have to work hard to inflate them),
glue to wood,
water,
2 large glass or plastic bowls,
spoon,
scissors,
pin or needle,
clothespins,
spray paint – if you are using white cordwood, once the cordwood balloon dries, you can paint it any color you want;
protective gloves.
Making a cotton ball step by step
Inflate as many balloons as you want to have “balls”. Balloons must be inflated to about 1/3 of their size, but you must be careful that they have similar sizes. The colors of the balloons are irrelevant – they just serve as a mold.
Pour wood glue into one of the bowls. Then, place a skein of cordon in one of them and soak it thoroughly in the glue – so that the cordon is completely covered. Thanks to this treatment cotton balls will be stiff.
Soaked in glue cordon, put into an empty (clean) bowl. Then wrap thread soaked in glue very carefully balloon. Balloon should be wrapped with thread in different directions – so you can accurately and effectively cover its entire surface. Balls thanks to this will look very elegant.
When the balloon is completely covered with cordon, it should be left to dry – it is best to hang it on a string, pinning a buckle. In this way, you should proceed with all the balloons. They should dry on a string for 1-2 days. At this stage, you can determine the order in which the finished cotton balls will be arranged.
Once the balls are dry, you can pull them off the string. Pierce each balloon in the ball and wait until the air comes off completely.
Make a tiny hole in the balls so you can pull out the balloon remnants. If there is “some part” of the balloon left inside, you can pull it out with a stick or tweezers. The threads should be glued together very well – none can move or stand out.
When all the balloons have been pulled out from the center, arrange them in the order of your choice. The next step is to insert the cotton balls into the lights. If the balloon opening is too small for the lights, you can enlarge it with scissors. If the hole is too big, you can glue it on with super glue or hot glue.
The last step is to check if all the elements have been attached properly. The finished decoration can be hung in any place.
Where can you hang cotton balls?
Cotton balls can be used not only to decorate the head of the bed, tipi or shelves. They look great as decoration on a roofed terrace or balcony. Always remember about access to a power source or choose battery-powered lights.
Cotton balls fit into any interior – just choose colors that match the style of the room, e.g. for Scandinavian style cotton balls in grey, white and black are perfect. For example, for Scandinavian style, grey, white and black cotton balls will fit perfectly. For glamour style interiors, glittering silver or gold yarn balls will be perfect.